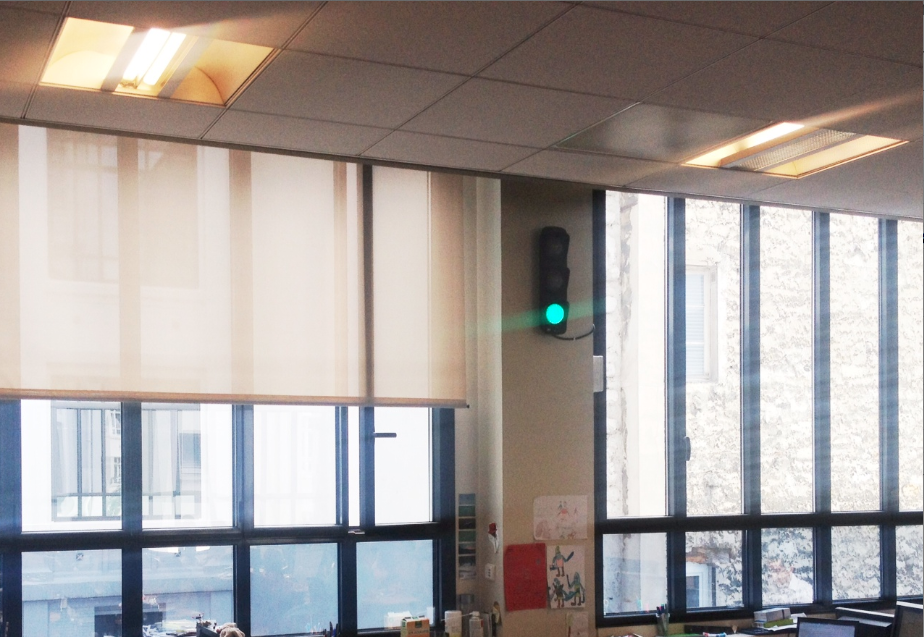
Real-world traffic light as a continuous integration feedback device
The goal of this project is to have a physical traffic light in my office to monitor the current status of our latest development branch in our continuous integration system (Jenkins). Several similar projects have shown that a fun notification system encourages developers to pay more attention to continuous integration. These so called extreme feedback devices have been very popular since the advent of extreme programming.
So how does it work? The Raspberry Pi is a credit-card-sized single-board computer running a GNU/Linux OS with a low-powered ARM processor. It uses a SD memory card for storage. The Raspberry Pi has an onboard ethernet adapter as well as 2 USB ports, HDMI video output and jack audio output. It is powered by 5V DC via a micro B USB socket. Finally the Raspberry Pi has 17 GPIO (General Purpose Input Output) pins that can be used to communicate with low-level peripherals.
So the Raspberry Pi has all the features we need for this project. We can use the ethernet connection to get the information we need for the Jenkins server and use GPIO pins to control the lights.
Bill of Materials:
- Traffic light
- Relay board
- Raspberry Pi (model B)
- 5V power supply
- electrical junction box
In France traffic lights are composed of three independent light modules housed in a metal, waterproof container. Most recent traffic lights use LEDs instead of light bulbs, which is good since LEDs are much more power-efficient and last longer. It was surprisingly easy to find a decommissioned traffic light on eBay. The light has a single cable containing 4 electrical wires: one phase wire for each light (conveniently colored coded with the same color as the light it powers) and one common neutral wire. Main AC power (230V) is required to turn a light on.
This is probably a good time to remind you that main electric power is dangerous. If you manipulate this much electricity without the proper safety measures, it is likely that you will hurt yourself or worst. You have been warned.
Now that we know how traffic lights work, we need a way to control ours. What we want is some kind of switch that will allow us to turn each light on or off by breaking it's power input using some sort of signal. Such device is called a relay. There are many sorts of relay but for this project I chose to use what's called a solid state relay or SSR. These relays have the advantage of being completely silent (other kinds of relay have sometimes make loud clicking noises).
Relays can be bought individually but they are also sold in bundles mounted on a board. For these project I found a Sainsmart board of 4 SSRs with LEDs to indicate the state of each of them. This board conveniently requires 5V to operate, like the Raspberry Pi.
The Raspberry Pi is fairly inexpensive ($35) and it can be bought online fairly easily. Since it can run a full GNU/Linux OS, the possibilities are endless. I chose to install Raspbian (derived from my favorite distro Debian) and to use Perl scripts and wget to fetch the current status in Jenkins.
You can read here more information on how to use the Raspberry Pi GPIO pins. For this project I am using GPIO pins 17, 22 and 27. Each pin is controlling one of the channel of the relay, it means that when a pin is turned on, the relay board will close the corresponding switch, letting the power go through and therefor turning on the corresponding light.
We have two components, the Raspberry Pi and the relay board, that required 5V DC. So we need a power supply to convert the main AC power to 5V DC. These can be bought online but I found one in my place that came with a now broken WiFi router. So all I had to do is open the power supply to take the circuit out and solder wires where the power plugs where connected.
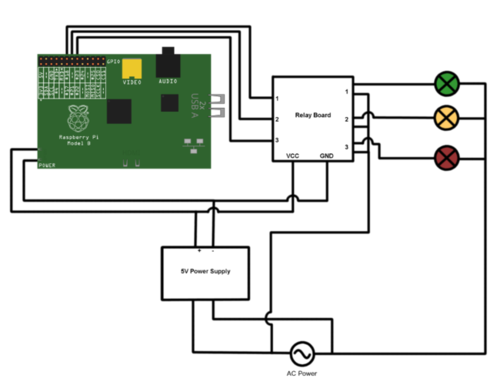
This project required little soldering. It was needed only to put longer wires on the power supply circuit and to attach a cut in half micro USB cable to it (to power the Raspberry Pi). The rest of the circuit is fairly simple as shown in the schema below.
That's it. So I hope this will inspire you to start your own extreme feedback project.
Short URL for this post: http://lepl.us/1g